Right, so you have your lovely Eee Pad Transformer in your happy hands and you’re dying to nab some shots with the 5MP onboard digital camera. It’s dead easy to use. Once you have logged into your Transformer tap on the App button in the top right-hand corner and then on Camera.
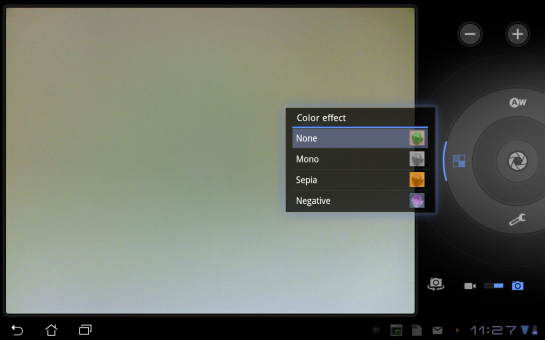
Once in Camera you can choose whether you want the lens pointing away from you or towards you by tapping the image of a camera with an arrow swirling beneath it. Tap on A/W to set your white balance, and on the square with four shaded squares (on the left of the iris) to set the colour themes you like.
I took the picture above using the sepia effect and this one using no effects at all. The quality is quite brilliant and the camera does the focusing for you automatically.
The spanner icon at the bottom of the iris sets the exposure, picture size and picture quality settings. You can adjust these with a swoosh and tap of the finger. I absolutely love this camera app as kids can have as much fun playing with it as you do and it really can do wonders for encouraging their confidence with technology and their creativity.
Once you have enough images tap the small outlined window on the bottom left of the main image. This will take you through to the Gallery. Tap the Play button (this looks exactly like any Play button as an arrow inside a white box) to view all your images as a slideshow.
The next button looks like one dot with two other dots radiating from it in straight lines. Tap this and you get instant sharing access to Picasa, Bluetooth, Tweetdeck, Dropbox, Evernote, Facebook, ASUS WebStorage, Gmail and Email. Pant, pant, it is quite a lengthy list.
To upload your image to Picasa just tap it and you’ll be taken to an Upload Photo screen. If you have not set your gmail account in your Transformer yet, it will ask you for your email address and log-in details. Name your image, select the Album and tap Upload.
If you cannot connect go to Apps>>Settings>>Accoungs & sync. Tap on Add account and fill in your details using the email address you have used to access or set up your Picasa Web Albums. Then go back to Gallery and tap on Picasa again. This time it should work effortlessly.
The tab on the far right which consists of four lines running parallel to one another horizontally is the edit tab. Here you can rotate the image, crop it, and set it as your contact photo or wallpaper.
That’s it. You have just managed to shoot, edit and share a photograph you’ve taken on your Eee Pad Transformer. It’s easy and simple. If you have any issues syncing your email address or uploading to Picasa, just check out our simple tutorials on installing and using Picasa here on Family Style.
Related Articles
-
http://twitter.com/cloudsmesh Vishal


