Yesterday I took you through setting up the wired and wireless networks, today it’s all about getting those pesky files to show up on the O!Play from your Windows PC. This didn’t turn out to be as easy as I’d hoped but, fortunately, the problem didn’t lie with the ASUS O!Play media player. It was Windows…
So, first thing, turn on your ASUS O!Play BDS-700 media player and wait for it to boot up. ASUS HQ recently answered the question about how long it takes to boot the O!Play – about 25-30 seconds – which isn’t long at all. In fact, it is just long enough to get your PC set up.
Click on Windows Media Player and go to Stream>>Allow internet access to home media. You will have to sign in with your online ID which is, often, your Windows Live ID. If you don’t have one, you can follow the onscreen instructions to do so.
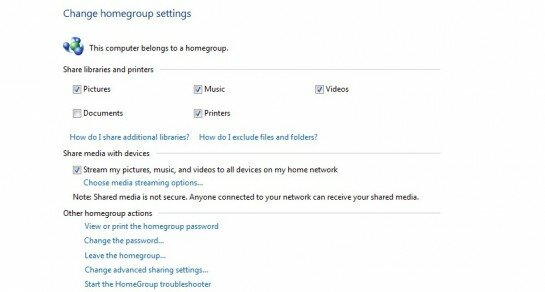
Next up you need to click on Streaming again and then select More Streaming Options. Go down to Choose homegroup and sharing options and select it. Don’t set up a homegroup. It’s a bit rubbish and will just interfere with the streaming to the BDS-700. This is where I hit my issues. The O!Play was happily connected and seeing my PC but none of the files were registering. It was a simple solution in the end but ever so tedious to find the problem which was, as I mentioned earlier, a Windows one.
Once you’ve gone through to the new screen, make sure that the box next to Stream my pictures, music, and videos to all devices on my home network, is checked. Also ensure that all the libraries you want to share are checked under the share libraries and printers tab.
Go back to your ASUS O!Play BDS-700 media player and select Videos. Using the arrow keys go down to DLNS and press OK. You will now be taken through to the file menu which is laid out like folders, just as you would see on your PC. Give the system a second to see the network and the files and then use the arrow keys to scroll through the files and folders that are now visible on the screen.
At this point the only thing I found a little disappointing was the onscreen navigation on the Home screen of the BDS-700. When you are scrolling through the options of Video, Music etc, if you want to see the DLNS you need to use the arrow keys to go down to that option, you can’t just press OK. It is a little clunky when compared with how seamlessly the rest of the system operates.
In my next post I am going to be examining how well movies play on the ASUS O!Play BDS-700 across a variety of different formats and picture quality.
I took a while to answer the questions you asked last time – I thought I would mysteriously reveal all as I unwrapped each layer of the BDS-700 media player – but that wasn’t a great plan. So, if you have any other burning thoughts, let me know and I’ll write the answers immediately.


Tamsin