RAID – All you need to know about RAID and set up guide for first timers.
What is RAID?
 A redundant array of independent disks, or RAID, is a way of storing the same data in different places (where the term redundant comes from) on multiple hard disks. There are many ways to use RAID and there are several different types of array. Some use multiple disks to increase performance – think a single lane road that has to serve traffic going in two directions – while others are used to increase reliability. Additionally, there is a third type of RAID that offer the best of both worlds – we’ve explained the various types of RAID below.
A RAID appears to the operating system to be a single logical hard disk, regardless of how many individual drives are part of the RAID array.
Striping – RAID employs the technique of disk striping, which involves partitioning each drive’s storage space into units ranging from a sector (512 bytes) up to several megabytes. The stripes of all the disks are interleaved and addressed in order. There are two types of disk striping: single user and multi-user. Single user disk striping allows multiple hard disks to simultaneously service multiple I/O requests from a single workstation, while multi-user disk striping allows multiple I/O requests from several workstations to be sent to multiple hard disks. This means that while one hard disk is servicing a request from a workstation, another hard disk is handling a separate request from a different workstation. This article focuses on setting up a RAID array with an Intel motherboard for the single user.
What kinds of RAID are there?
I know of 9 different kinds of RAID plus a performance RAID that has no redundancy built into it. These RAID configurations can and are used independently and in different combinations, below are the different kinds of a RAID that are used today.
- RAID-0: This technique has striping but no redundancy of data. It offers the best performance but no fault-tolerance.

- RAID-1: This type is also known as disk mirroring and consists of at least two drives that duplicate the storage of data. There is no striping. Read performance is improved since either disk can be read at the same time. Write performance is the same as for single disk storage. RAID-1 provides the best performance and the best fault-tolerance in a multi-user system.

- RAID-2: This type uses striping across disks with some disks storing error checking and correcting (ECC) information. It has no advantage over RAID-3.
- RAID-3: This type uses striping and dedicates one drive to storing parity information. The embedded error checking (ECC) information is used to detect errors. Data recovery is accomplished by calculating the exclusive OR (XOR) of the information recorded on the other drives. Since an I/O operation addresses all drives at the same time, RAID-3 cannot overlap I/O. For this reason, RAID-3 is best for single-user systems with long record applications.
- RAID-4: This type uses large stripes, which means you can read records from any single drive. This allows you to take advantage of overlapped I/O for read operations. Since all write operations have to update the parity drive, no I/O overlapping is possible. RAID-4 offers no advantage over RAID-5.

- RAID-5: This type includes a rotating parity array, thus addressing the write limitation in RAID-4. That means all read and write operations can be overlapped. RAID-5 stores parity information but not redundant data (but parity information can be used to reconstruct data). RAID-5 requires at least three and usually five disks for the array. It’s best for multi-user systems in which performance is not critical or which do few write operations.
- RAID-6: This type is similar to RAID-5 but includes a second parity scheme that is distributed across different drives and thus offers extremely high fault- and drive-failure tolerance.
- RAID-7: This type includes a real-time embedded operating system as a controller, caching via a high-speed bus, and other characteristics of a stand-alone computer. One vendor offers this system.
- RAID-10: Combining RAID-0 and RAID-1 is often referred to as RAID-10, which offers higher performance than RAID-1 but at much higher cost. There are two subtypes: In RAID-0+1, data is organized as stripes across multiple disks, and then the striped disk sets are mirrored. In RAID-1+0, the data is mirrored and the mirrors are striped.

- RAID-50 (or RAID-5+0): This type consists of a series of RAID-5 groups and striped in RAID-0 fashion to improve RAID-5 performance without reducing data protection.
- RAID-53 (or RAID-5+3): This type uses striping (in RAID-0 style) for RAID-3′s virtual disk blocks. This offers higher performance than RAID-3 but at much higher cost.
What can I use to build a RAID?
Today we are spoilt for choice. We have SSD drives,
SSD and mechanical hybrid drives,
I have even built a RAID array using ram with Acard Technology Solid State units.
Capacity is similarly as varied, with 3TB being the current maximum capacity if I am not mistaken. But storage is such a fast moving industry that is driven by innovation that by the time this article is published there could be larger capacity hard drives on the market and this information could be redundant. However let us return to the question at hand, in short we can use any storage medium that we can connect to our motherboard. Most commonly used are SSD and mechanical hard drives.
For purposes of this article we are going to be using two ADATA 60GB S511 drives. RAID requires that at least two drives be used but the upper limit is dependent on the type of RAID and your hardware’s limitations.
RAID by Numbers
- Download Intel’s Latest Rapid Storage Technology Drivers and save the install package to external media such as a USB flash storage device. Intel Downloadcenter Link. The RST version you use will make a difference to your overall performance. I like to have the latest chipset drivers on hand too. You can read about how I prepare for a new OS install here.
- Prepare your new system and ensure that you have written down or printed out the instructions if you do not have a notebook or tablet at hand.
- Boot into BIOS pressing F2 or Del.

- Navigate to your Storage Configuration, Configure SATA options.

- Select RAID

- F10 Enter to Reboot.

- As soon as the Intel Matrix Storage Manager Screen appears for a few seconds press Ctrl+I
- Select Create RAID Volume.

- You will then arrive at a screen with four simple steps
- Select RAID Level (RAID0) or whichever RAID you wish to use.
- Select Disks (Tab to Down and Press Enter To Select)
- Select Stripe (Intel Recommends 16k for SSDs)
- Select Capacity (At Max By default)
- Enter and when asked at the conformation screen press Y for yes.
- Escape to reboot.
- Insert your OS medium - I use a USB stick for OS installation
- System will reboot.
- F8 to select boot options, or
- Go back into BIOS F2 or Del.
- Navigate to the BOOT section and confirm that RAID volume is set as the primary boot device. I like to do my clean install with no other drives present. In other words I only have the RAID volumes available. If you have other drives present, the possibility of other drives being set by default as the boot disc is likely. Therefore you need to ensure the primary boot is set to the RAID volume.
- F10 to Save and Exit
- Installation of your OS will now start.

- Follow all prompts as per normal
- Select your installation partition and install Windows. During the Windows 7 installation you need to select the drive or partition for your OS to be installed. Warning - if you have multiple disks in the system please select wisely as installing a OS can wipe all data from your hard drive if you get your selection wrong. For this reason, I prefer not to have any other drives present in the system during installation).
- Direct the OS installer at your RAID drive, and let the OS (Windows 7) do the rest, you do not need to format the drive if you’re using SSD drives. The Windows installation will start and simply carry on as normal.
- After the system has rebooted a few times, you will have successfully set up your first RAID. Congratulations!
- Install the Intel chipset installer utility.

- Reboot when requested.
- Install the latest Intel RST Package that you downloaded and stored on a USB flash drive.
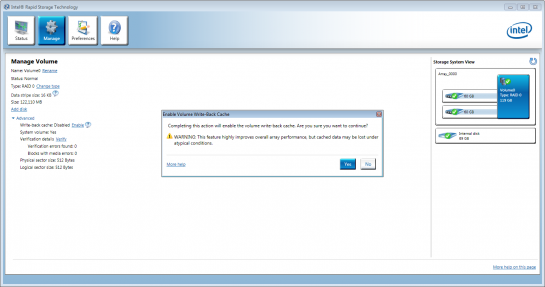
- Enable Write Back Cache In RST.
- Your system is running in RAID and your performance will be good. But we are not done yet.
- Go to Programs and open the new folder called Intel.

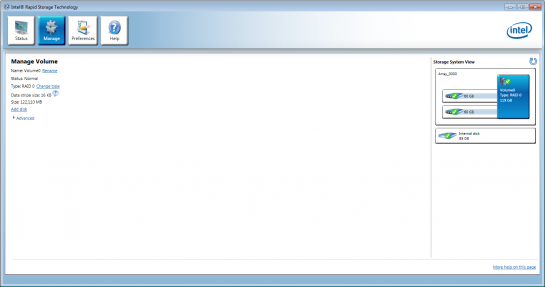
- Open the Intel Rapid Storage application:


- Click on ‘Manage

- Click on Advanced

- Click to enable Write Back Cache and select yes to continue.
And that is all there is to it. Your RAID will be fully functioning and will work perfectly. All that is left is for you to enjoy your RAID and your system.


Dagmar